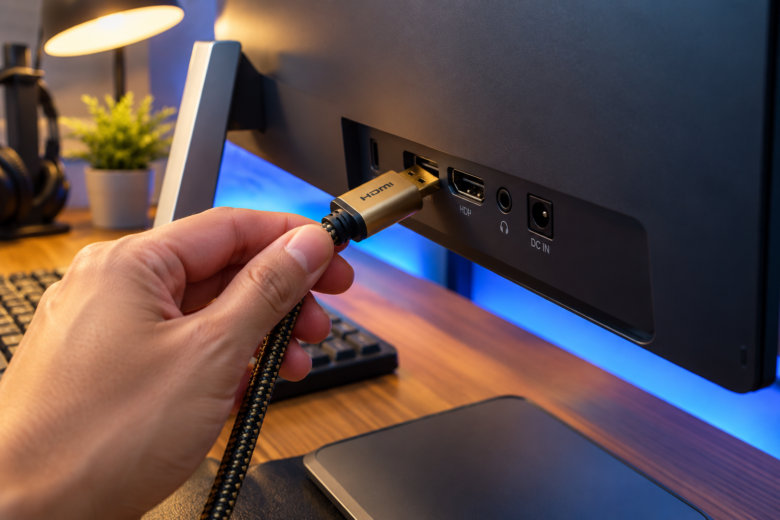
Connecting a PC or laptop to an external monitor or television via an HDMI cable is supposed to be a single-cable solution. Unlike older VGA or DVI connections that only carried video signals, the HDMI standard was engineered from day one to transmit both high-definition video and multi-channel digital audio down the exact same wire.
Yet, one of the most common frustrations after setting up a dual-monitor workstation or connecting a laptop to a living room TV is complete silence. The picture looks razor-sharp, but the audio either stays trapped in your laptop’s tiny built-in speakers or vanishes entirely.
When HDMI audio fails on Windows 10 or Windows 11, it is rarely a broken cable. Instead, it is usually a routing miscommunication between your graphics card (which actually generates the HDMI audio signal) and the Windows sound manager. Work through this troubleshooting sequence to force Windows to recognize your display and route sound directly to your monitor speakers.
1. Confirm Your Monitor Actually Has Built-in Speakers
Before spending an hour digging through driver registries and control panels, verify that your monitor is physically capable of producing sound. This catches a surprising number of users off guard.
Many modern gaming monitors and ultrawide productivity displays ship without internal speakers to keep the bezels ultra-thin and the manufacturing costs down. Even full-sized monitors that lacks speakers will still show up in Windows as an “HDMI Audio Output” device. Why? Because many monitors feature a 3.5mm audio pass-through jack on the back. The monitor receives the digital audio over the HDMI cable and waits for you to plug wired headphones or desktop speakers into the back of the screen.
How to verify:
- Look closely at the bottom bezel or rear casing of your monitor for physical speaker grilles.
- Press the physical menu button on your monitor to open the On-Screen Display (OSD).
- Navigate to the Audio or Volume sub-menu. Confirm the volume isn’t set to zero or muted inside the monitor’s own hardware firmware. If no audio menu exists, look up your monitor’s exact model number online to confirm it has integrated speakers.
2. Force HDMI as the Default Playback Device
When you plug in an HDMI cable, Windows is supposed to automatically switch your active audio output to the new display. However, if you use a USB headset, a Bluetooth speaker, or onboard motherboard audio, Windows 11 often refuses to give up your previous default device.
Furthermore, HDMI audio devices can easily hide inside the Windows Sound Control Panel if they were accidentally disabled in the past.
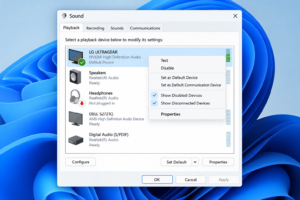
How to unhide and force the HDMI output:
- Press the Windows Key + R on your keyboard to open the Run dialog box.
- Type
mmsys.cpland hit Enter. This bypasses the modern settings menu and opens the classic, more powerful Sound Control Panel. - Under the Playback tab, right-click anywhere in the empty white space of the device list.
- Make sure both Show Disabled Devices and Show Disconnected Devices have checkmarks next to them.
- Look for the name of your monitor, TV brand, or an entry labeled NVIDIA High Definition Audio, AMD High Definition Audio, or Intel Display Audio.
- If the icon is grayed out, right-click it and select Enable.
- Right-click the monitor again and select Set as Default Device and Set as Default Communication Device. A green checkmark will appear next to the display icon.
3. Understand the GPU Connection: Reinstall HD Audio Drivers
Here is the most misunderstood detail about HDMI audio: your motherboard’s sound card (like Realtek) has nothing to do with HDMI sound.
Because the HDMI cable plugs directly into your graphics card (or uses the integrated graphics processor on a laptop), your GPU is fully responsible for encoding and sending the audio signal. NVIDIA, AMD, and Intel all bundle dedicated “High Definition Audio” drivers right alongside their graphics drivers. If a recent Windows update or a quick GPU driver installation skipped the audio component, your monitor will never receive a sound signal.
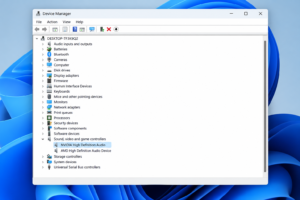
How to verify and repair your GPU audio drivers:
- Right-click the Windows Start button and open Device Manager.
- Scroll down and expand the section labeled Sound, video and game controllers.
- Look beyond your standard Realtek or USB audio devices. You need to see an entry that matches your processor or graphics card:
-
NVIDIA Graphics: NVIDIA High Definition Audio
-
AMD Graphics: AMD High Definition Audio Device
-
Intel Integrated Graphics: Intel(R) Display Audio
-
- If you see a yellow exclamation mark next to any of these, or if they are missing entirely, your GPU audio driver is corrupted.
- To fix this Properly, open your graphics software (NVIDIA App / GeForce Experience, AMD Software: Adrenalin Edition, or Intel Driver & Support Assistant).
- Download the latest graphics driver package, but instead of choosing “Express Installation,” select Custom Installation.
- Ensure the box next to HD Audio Driver is checked, and check the box at the bottom labeled Perform a clean installation. This strips out broken registry keys and installs a fresh audio pipeline between your GPU and your HDMI port.
4. Check the NVIDIA Control Panel Audio Routing
If you have a desktop PC or gaming laptop with an NVIDIA graphics card, the card has its own internal switchboard that controls which display ports are allowed to carry audio. Sometimes, an update flips this internal switch to “No Audio,” overriding anything you do in the Windows settings.
- Right-click on an empty area of your desktop and select NVIDIA Control Panel (on Windows 11, you may need to click “Show more options” first).
- In the left-hand navigation pane, expand the Display section and click on Set up digital audio.
- On the right side, you will see a list of every HDMI and DisplayPort connection on your graphics card.
- Locate the HDMI port connected to your monitor. If the dropdown menu next to it says “Turn off audio,” click the dropdown and select the name of your monitor instead.
- Click Apply at the bottom right of the window.
5. Fix the “HDMI Handshake” (EDID) Glitch
When you turn on your PC and your monitor, the two devices perform an invisible digital introduction called an EDID (Extended Display Identification Data) handshake. During this split-second exchange, the monitor tells the computer: “Hello, I am a 1080p screen, I run at 60Hz, and I have two stereo speakers.”
If you wake your PC from sleep mode, or if your monitor turns on a fraction of a second too late, this handshake can fail partially. The PC gets the video information, misses the audio confirmation, and assumes your monitor is a mute display.
How to force a fresh HDMI handshake:
- Leave your computer turned on and booted into Windows.
- Unplug the HDMI cable from the back of your computer.
- Unplug the power cord from the back of your monitor (don’t just press the power button—physically remove the power cable).
- Wait a full 60 seconds. This allows the capacitors inside the monitor’s logic board to drain completely, clearing its temporary hardware memory.
- Plug the monitor’s power cord back in and turn the screen on.
- Once the monitor is awake and looking for a signal, plug the HDMI cable back into your PC. Windows should chime and immediately register the audio hardware.
6. Beware of Passive Adapters and Splitter Cables
Take a close look at the cable connecting your computer to the screen. Are you using a pure, end-to-end HDMI cable, or is there an adapter involved?
| Connection Type | Supports Audio? | Why It Fails |
| Standard HDMI to HDMI | Yes | Only fails if the internal copper pin for audio is physically damaged. |
| DisplayPort to HDMI | Usually Yes | Cheap “passive” adapters sometimes drop the audio channel during conversion. |
| USB-C Hub to HDMI | Yes | Fails if the USB-C port on the laptop only supports data and not full DisplayPort Alt-Mode. |
| DVI to HDMI Cable | Rarely | Standard DVI ports were designed strictly for video; they lack the physical pins to output sound. |
If you are using a DVI-to-HDMI adapter on an older desktop graphics card, audio will likely never work over that cable. You will need to run a separate 3.5mm auxiliary audio cable from the green port on your PC’s motherboard directly into the “Audio In” port on the back of your monitor.
7. Lower the Audio Bitrate Format
Built-in monitor speakers are notoriously basic. They are typically powered by tiny 2-watt or 5-watt amplifiers designed for system chimes and basic voice calls. If Windows is configured to push uncompressed 24-bit studio-grade audio or Dolby Digital 5.1 surround sound down the HDMI cable, the monitor’s cheap internal audio decoder will simply choke and mute itself.
To switch to a compatible format:
- Open the classic Sound Control Panel (
mmsys.cpl). - Right-click your HDMI monitor under the Playback tab and click Properties.
- Go to the Supported Formats tab and uncheck anything like Dolby Digital or DTS Audio unless you are connected to a dedicated home theater soundbar.
- Move to the Advanced tab. Under “Default Format,” click the dropdown menu and select 16 bit, 44100 Hz (CD Quality) or 16 bit, 48000 Hz (DVD Quality).
- Click Apply, then click the Test button. You should hear a chime play through the left and right channels of your display.
Frequently Asked Questions
Why does my HDMI audio stop working every time my PC wakes up from sleep?
This is a classic EDID handshake timing issue. Your graphics card wakes up from sleep mode much faster than your monitor does. Because the monitor takes three or four seconds to power its internal board, the GPU assumes no audio device is connected and routes the sound back to your PC. Turning the monitor off and back on again after waking your PC usually restores the audio without needing a reboot.
Does HDMI 1.4 vs. HDMI 2.1 affect whether monitor speakers work?
No. Even the oldest HDMI 1.0 specification from over twenty years ago supports standard two-channel stereo audio. Newer HDMI 2.1 cables are only necessary for high-refresh-rate 4K gaming and advanced home theater formats like Dolby Atmos (eARC). Any working HDMI cable will carry stereo sound to a desktop monitor.
Why is my monitor showing up in Sound Settings with the green bar moving, but I still hear nothing?
If the green volume meter next to your monitor in the Windows Sound panel is bouncing up and down when you play a YouTube video, Windows and your GPU are doing their jobs properly. The digital signal is successfully reaching the screen. This means the mute issue is happening on the monitor itself: either the monitor’s internal OSD volume is turned down to zero, a pair of headphones is plugged into the back of the monitor (which hijacks the signal), or the monitor lacks physical speakers entirely.
Can I use my motherboard’s HDMI port just for audio while my GPU handles the video?
While technically possible by enabling “IGPU Multi-Monitor” in your motherboard’s BIOS, it is strongly discouraged. It forces your system to render a “phantom” second desktop display just to keep the HDMI audio channel alive, which causes mouse cursors to get lost off-screen and introduces frame-rate stuttering in games.
Sources & References
- For official documentation on managing display audio drivers and multi-monitor sound configurations, visit Microsoft’s Windows Audio Troubleshooting Guide.
- Learn more about how HDMI licensing, EDID handshakes, and audio return channels function via the Official HDMI Forum Specification Page.
- For clean installations of graphics-integrated audio drivers, consult NVIDIA’s HD Audio Driver FAQ or AMD’s Driver Support Portal.