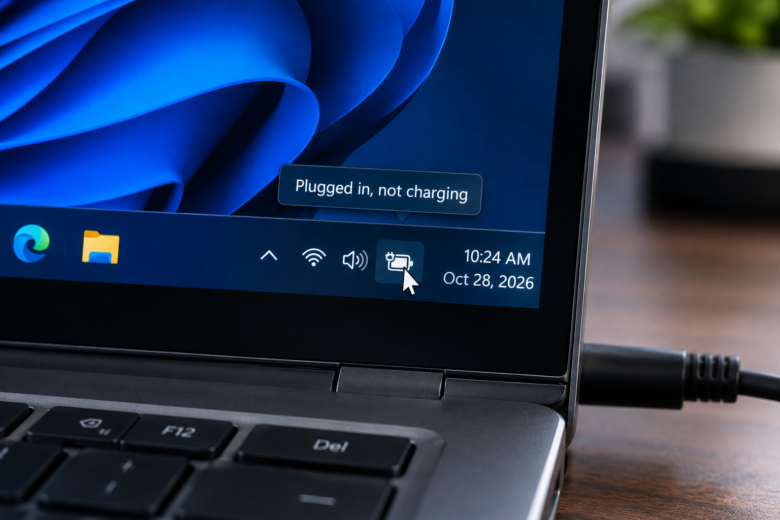
You connect your laptop to the power outlet, see the charging indicator light turn on, but hover over the battery icon in the Windows taskbar only to find a frustrating message: “Plugged in, not charging.“
Your laptop is receiving power, preventing it from shutting down immediately, but the battery percentage refuses to climb. If you rely on your laptop for mobility, a battery stuck at 10% effectively turns your portable machine into a tethered desktop.
Most users immediately assume the battery is dead and needs a costly replacement. While a degraded lithium-ion battery is a possibility, this error is frequently caused by a software miscommunication between Windows, your laptop’s firmware, and the power management drivers. Before you spend money on replacement hardware, you need to systematically isolate whether the block is happening at the software level or if there is a physical electrical failure.
1. The ACPI Driver Refresh (Software Fix)
The most common software-level culprit for a battery that refuses to charge is a corrupted driver. Windows manages laptop power states using a specific driver called the Microsoft ACPI-Compliant Control Method Battery.
If this driver gets stuck in a faulty state, it misreads the battery’s charge level and tells the motherboard to stop sending power to the cells, assuming they are already at 100%. Uninstalling and reinstalling this driver forces Windows to re-evaluate the battery’s true physical state.
Step-by-Step Driver Reset:
- Right-click the Start Button and select Device Manager.
- Locate the Batteries category and expand it by clicking the arrow.
- You will see two or more items. Look specifically for Microsoft ACPI-Compliant Control Method Battery.
- Right-click this specific entry and select Uninstall device.
- A warning prompt will appear. Click Uninstall to confirm. (Do not worry, your laptop will not shut down if it is plugged into the wall).
- Do not uninstall the “Microsoft AC Adapter” driver.
- Click Action at the top menu bar of Device Manager and select Scan for hardware changes.
Windows will immediately detect the “missing” battery and reinstall a fresh, uncorrupted version of the ACPI driver. Check your taskbar; in many cases, the status will instantly change to “Charging.”
2. Disable Battery Conservation Thresholds (Software Fix)
If your battery charges perfectly fine but stops exactly at 60% or 80% and displays “Plugged in, not charging,” your laptop is not broken. It is doing exactly what it was programmed to do.
Modern laptop manufacturers include proprietary power management software designed to extend the total lifespan of lithium-ion batteries. Keeping a battery constantly pegged at 100% degrades the internal chemistry rapidly. To prevent this, software intentionally cuts off the charge at a lower threshold if you keep the laptop plugged in constantly.
How to disable thresholds by manufacturer:
- Lenovo: Open the Lenovo Vantage app. Navigate to Power > Power Settings. Look for Conservation Mode and toggle it off. The battery will now charge to 100%.
- Dell: Open Dell Power Manager. Go to the Battery Information tab, click Settings, and change the profile from “Primarily AC Use” to Standard.
- ASUS: Open the MyASUS app. Go to Customization > Power & Performance. Change the Battery Health Charging setting from “Maximum Lifespan Mode” (60%) to Full Capacity Mode.
- HP: Restart the computer and rapidly press F10 to enter the BIOS. Look for a setting named Battery Care Function or Adaptive Battery Optimizer and disable it.
3. Perform a Hard Power Drain (Hardware/System Fix)
Laptops build up residual static electricity in their capacitors over time. This static charge can interfere with the motherboard’s ability to communicate with the battery sensors, leading to a false “not charging” state. A hard power reset drains this residual electricity.
If your laptop has a removable battery:
- Unplug the AC power adapter from the laptop.
- Physically remove the battery from the bottom of the machine.
- Press and hold the laptop’s physical Power Button for 60 seconds. (Do not skip this duration; the capacitors need time to fully discharge).
- Reinsert the battery and plug the AC adapter back in.
- Turn the laptop on and check the charging status.
If your laptop has an internal (non-removable) battery: You cannot physically pull the battery, but manufacturers build in a workaround. Unplug the AC adapter and peripheral devices. Press and hold the Power Button for 30 to 60 seconds. The laptop will turn on and then abruptly force shut down. Keep holding the button. Once the time has elapsed, plug the charger back in and power it on normally.
4. Verify AC Adapter Wattage and BIOS Recognition (Hardware Fix)
Not all chargers are created equal. If you are using a third-party replacement charger, a USB-C cable hooked up to a phone brick, or a charger from an older laptop model, it might provide enough wattage to keep the laptop running, but not enough excess wattage to actually charge the battery simultaneously.
Furthermore, brands like Dell use a proprietary middle pin inside the barrel charger to communicate with the laptop. If this pin bends or breaks, the laptop will draw power to operate but will actively refuse to charge the battery as a safety precaution.
How to check charger health:
- Restart your laptop and enter the BIOS/UEFI (usually by tapping F2, F12, DEL, or ESC immediately upon boot).
- Look for an AC Adapter Type or Battery Information section.
- If the BIOS says “AC Adapter = Unknown” or “Warning: 65W AC adapter detected, 90W required,” the problem is your charger, not your battery.
- Inspect the physical tip of your charger for a bent center pin or debris inside the barrel. If the BIOS cannot identify the charger, you must replace the power brick.
5. Identifying Internal Hardware Failure
If you have refreshed the ACPI drivers, disabled conservation software, performed a hard reset, and verified your AC adapter in the BIOS, the issue transitions from a software glitch to a physical hardware failure. There are two primary points of failure here.
The DC Power Jack: The port where you plug in your charger is a physical component soldered to the motherboard (or connected via a small ribbon cable). If the port feels loose, wiggles excessively, or only charges when you hold the cable at a specific angle, the internal solder joints are broken. The port needs to be replaced.
Dead Battery Cells: Lithium-ion batteries have a finite number of charge cycles (usually around 500 to 1,000 cycles). Once the internal chemical structure breaks down completely, the battery can no longer hold a charge, triggering the “not charging” error.
You can generate a detailed Windows battery health report to confirm this:
- Open Command Prompt as Administrator.
- Type
powercfg /batteryreportand press Enter. - Open the HTML file path provided in the command prompt window.
- Compare the Design Capacity to the Full Charge Capacity. If the Full Charge Capacity is drastically lower than the design capacity (e.g., 10,000 mWh remaining out of a 50,000 mWh design), the battery is chemically dead and requires physical replacement.
Summary Troubleshooting Checklist
Tackling laptop power issues requires process of elimination. Start with the easiest software fixes before buying new parts:
- Software: Uninstall the Microsoft ACPI battery driver in Device Manager and reboot.
- Settings: Check apps like Lenovo Vantage or Dell Power Manager for battery life threshold limits.
- Hardware Hybrid: Unplug everything and hold the power button for 60 seconds to drain static.
- Hardware Final: Generate a Windows battery report to check for dead cells, and inspect your charger for bent pins.
Frequently Asked Questions
Is it bad to leave my laptop plugged in all the time?
Keeping a laptop plugged in at 100% constantly degrades the battery’s maximum capacity faster due to the stress of maximum voltage. If you use your laptop as a desktop replacement, it is highly recommended to enable battery conservation mode in your manufacturer’s software, which limits the charge to 60% or 80%.
Why does my battery charge when the laptop is off, but not when it is turned on?
This is a classic symptom of an underpowered charger. When the laptop is off, the small amount of wattage provided by the charger goes entirely to the battery. When turned on, the CPU and screen consume all available power, leaving none left over to charge the cells. You need a charger with a higher wattage output.
Can a Windows Update cause the “Plugged in, not charging” error?
Yes. Major Windows feature updates can occasionally corrupt the ACPI-Compliant Control Method Battery driver. Uninstalling the driver in Device Manager and letting Windows reinstall it upon reboot usually resolves post-update charging bugs.
Sources & References
- Microsoft Learn / Windows Support: Troubleshooting battery charging issues and ACPI driver management in Windows 10 and 11.
- Lenovo Official Support: Battery Conservation Mode functionality and managing battery thresholds in Lenovo Vantage.
- Dell Technical Documentation: Understanding AC adapter wattage errors and BIOS recognition protocols for proprietary power supplies.