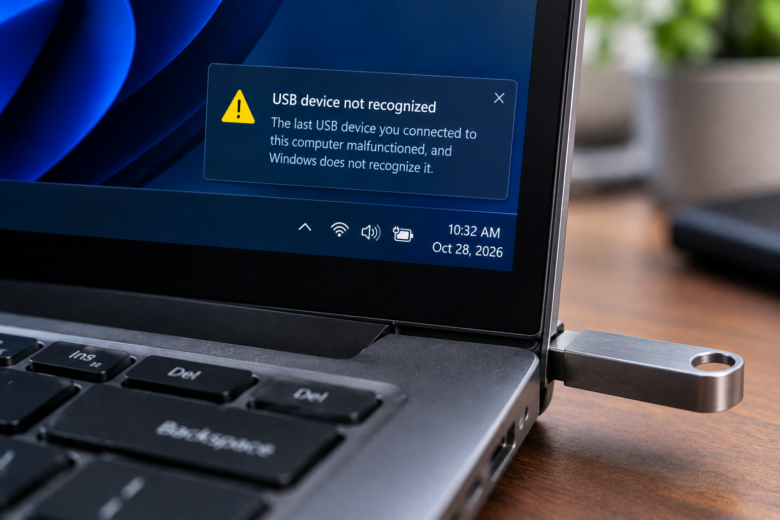
There are few sounds more stressful than plugging a USB flash drive into your computer, hearing the connection chime, and immediately seeing the dreaded pop-up: “USB device not recognized. The last USB device you connected to this computer malfunctioned, and Windows does not recognize it.”
Your immediate concern is not the hardware itself—flash drives are cheap. The real panic sets in regarding the data trapped inside. Whether it contains years of family photos, a critical work presentation, or your only backup of important financial documents, losing access to a USB drive feels like a digital disaster.
When Windows fails to read a drive, the operating system often panics and prompts you to format it. Before you click anything, stop. Formatting will wipe the index of your files, making recovery exponentially harder. The problem is rarely a completely dead drive. More often, the issue stems from corrupted USB drivers, power delivery failures, missing drive letters, or minor file system errors.
This guide provides a systematic, step-by-step approach to fixing the “USB Not Recognized” error, forcing Windows to read the drive, and recovering your data safely without resorting to a factory format.
1. The Golden Rule: Cancel the “Format Disk” Prompt
Before attempting any technical fixes, you must understand how Windows handles corrupted file systems. If your USB drive’s partition table gets slightly misaligned—often caused by pulling the drive out without clicking “Eject” first—Windows will fail to read it.
Instead of trying to repair it natively, Windows will present a dialog box stating: “You need to format the disk in drive X: before you can use it.”
Do not click Format.
Formatting creates a brand-new file system (like FAT32 or exFAT). While this will make the USB drive usable again, it effectively erases the master file table that points to your data. Your files might still physically exist on the flash memory chips, but without the index, your computer cannot find them. Always click Cancel and proceed to the non-destructive troubleshooting steps below.
2. Hardware and Power Isolation Tests
Software troubleshooting is useless if the physical connection is failing. A USB drive requires both data transfer pins and power delivery pins to make a secure connection.
- Switch to the Motherboard Ports: If you are using a desktop PC, do not plug the USB into the front panel of the PC case. Front ports rely on internal extension cables that often suffer from voltage drops. Plug the drive directly into the rear I/O panel (the ports directly attached to the motherboard).
- Bypass USB Hubs: Unplug the drive from any unpowered USB splitters, monitor passthrough ports, or keyboard hubs. Plug it directly into a dedicated port on the machine.
- Clean the Contacts: Inspect the inside of the USB connector. Pocket lint, dust, or oxidized copper contacts can prevent the PC from reading the device. Use a wooden toothpick or a cotton swab lightly dipped in isopropyl alcohol to clean the metal contacts gently. Wait for it to dry before plugging it in.
If the physical hardware is clean and connected directly to the motherboard, but the error persists, the issue lies within the Windows driver stack.
3. Rebuild the USB Driver Stack via Device Manager
When you plug in a USB drive, Windows assigns a specific driver to communicate with it. If that driver becomes corrupted or stuck in a suspended power state, Windows will refuse to recognize the device, even if the hardware is flawless.
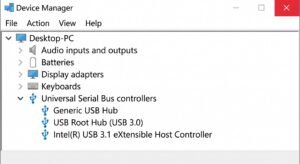
You can force Windows to rebuild this connection by uninstalling the USB Root Hubs.
- Right-click the Start Button and select Device Manager.
- Scroll to the bottom of the list and expand the Universal Serial Bus controllers section.
- You will see several items labeled USB Root Hub or USB Root Hub (USB 3.0).
- Right-click the first USB Root Hub and select Uninstall device.
- Repeat this process for every USB Root Hub listed. (Note: Your mouse and keyboard might temporarily stop working if they are USB-based. This is normal).
- Once they are uninstalled, restart your computer.
Upon booting up, Windows will automatically detect the missing root hubs and install fresh, uncorrupted drivers. Plug your USB drive back in. In many cases, it will instantly mount and display your files.
4. Assign a Drive Letter via Disk Management
Sometimes, Windows actually recognizes the USB drive perfectly, but it forgets to assign it a drive letter (like D:, E:, or F:). Without a drive letter, the USB will not show up in File Explorer, making it seem like the drive is dead or unrecognized.
We can fix this using the Windows Disk Management utility.
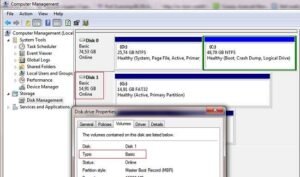
- Right-click the Start Button and select Disk Management.
- A window will open showing all connected storage devices. Look at the bottom half of the screen. Disk 0 is usually your main Windows hard drive. Look for Disk 1 or Disk 2 labeled as “Removable.”
- If you see your USB drive here, look at the block representing its storage space. If it says “Unallocated,” the partition is lost. But if it says “Healthy (Primary Partition)” and simply lacks a letter, you are in luck.
- Right-click the healthy partition block and select Change Drive Letter and Paths.
- Click Add, choose a letter from the drop-down menu (e.g., Z or X), and click OK.
Open File Explorer. Your drive should now appear, with all your data fully accessible.
5. Repair the File System with CHKDSK
If your drive appears in File Explorer but gives you an “Access Denied” or “File or Directory is Corrupted and Unreadable” error, the file system has software-level damage.
Instead of formatting, use the built-in Windows Check Disk (CHKDSK) command-line tool. This tool scans the flash memory for logical errors and repairs the directory structure without deleting your personal files.
- Take note of your USB drive’s letter (for example,
E:). - Click the Start button, type
cmd, right-click Command Prompt, and select Run as administrator. - Type the following command, replacing the letter
Ewith your actual USB drive letter:chkdsk E: /f /r /x - Press Enter.
Here is what those parameters do:
- /f tells Windows to fix any file system errors it finds.
- /r tells Windows to locate bad physical sectors on the flash memory and recover readable information.
- /x forces the drive to dismount before the scan begins, ensuring no background apps interfere.
Let the process run. It may take anywhere from a few minutes to an hour depending on the size of the drive. Once finished, check your drive again.
6. Data Recovery for “RAW” Drives
If CHKDSK fails and states that the drive is “RAW,” it means the partition table is so heavily damaged that Windows cannot identify if the drive is FAT32, exFAT, or NTFS.
At this stage, native Windows tools cannot help you, but your data is still physically there. You must use third-party data recovery software to extract the files before you format the drive to make it usable again.
How to extract data from a RAW USB:
- Download a reputable data recovery tool. Free options like TestDisk (highly effective but uses a command-line interface) or Recuva (user-friendly graphic interface) are excellent starting points.
- Install the software on your computer’s main hard drive, not on the USB.
- Open the software and select your RAW USB drive as the target.
- Run a “Deep Scan.” This process bypasses the broken file index and scans the raw memory chips for file signatures (like .jpg, .pdf, .docx).
- Once the scan completes, select the files you want to save and recover them to your computer’s hard drive.
Only after you have successfully extracted and verified your files should you go back to File Explorer, right-click the USB drive, and finally select “Format” to restore its normal functionality.
Summary of Best Practices
USB drives are incredibly convenient, but flash memory is volatile. To prevent the “Not Recognized” error from happening in the future, never pull a USB drive out of a computer while it is actively reading or writing data. Always use the “Safely Remove Hardware” icon in the Windows system tray.
Furthermore, never use a single USB flash drive as your only storage location for important files. Flash drives are designed for data transport, not long-term data archival.
Frequently Asked Questions
Why does my USB drive work on one computer but not another?
If a USB drive works on a laptop but is not recognized by your desktop, the issue is not the drive itself. It is likely a corrupted USB root hub driver on the desktop, a dead physical USB port, or aggressive USB selective suspend power settings in the desktop’s Windows power plan.
Can a power surge cause a USB not recognized error?
Yes. A sudden power surge, static electricity discharge, or a failing power supply unit (PSU) can overload the USB controller chip on the flash drive. If the controller chip is fried, the computer will not recognize the device, even if the memory chips holding your data are still intact. In this case, professional data recovery services are required.
What does it mean if my USB drive shows up as “Unallocated” in Disk Management?
“Unallocated” means the drive has lost its partition table. The computer sees the physical hardware, but it does not see a formatted area to store files. You will need to use partition recovery software (like TestDisk) to rebuild the partition table without losing the data.
Is it safe to use CHKDSK on a failing flash drive?
CHKDSK is generally safe for logical software errors (like an improper ejection). However, if the flash drive has severe physical hardware damage, running intensive scans like CHKDSK /r can stress the failing memory chips and accelerate their death. If the drive is making unusual electrical clicking sounds or getting dangerously hot, unplug it immediately.
Sources & References
- Microsoft Learn / Windows Support: Advanced troubleshooting for USB issues in Windows.
- CGSecurity (TestDisk Documentation): Data Recovery and Partition Table repair protocols for RAW drives.
- Western Digital / SanDisk Support: Troubleshooting flash drives that are not detected by Windows or macOS.