There is nothing quite as distracting as watching a movie and realizing the actor’s lips are moving a full second before you actually hear them speak. Audio desynchronization completely breaks the immersion of any video.
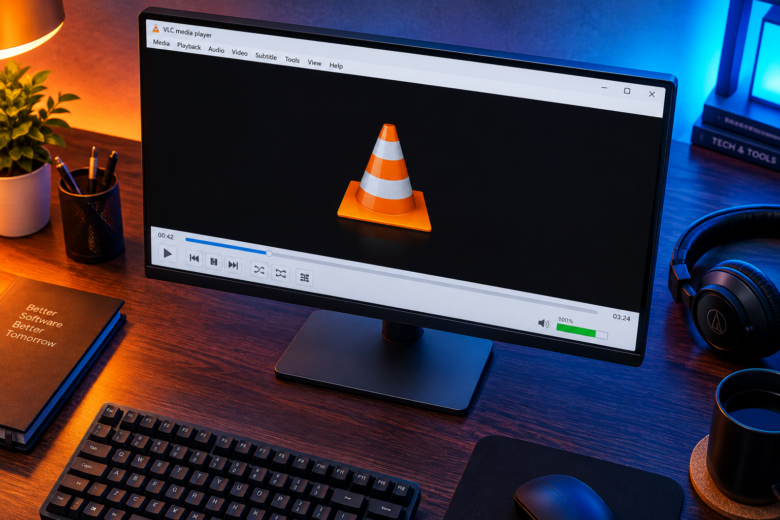
VLC Media Player is widely considered the undisputed king of desktop media playback because it comes packed with almost every codec imaginable. It can play nearly any file format you throw at it. However, this massive flexibility is exactly why you occasionally run into playback errors. When you download a poorly encoded MP4, play a corrupted MKV file, or stream a heavy 4K video from a slow external hard drive, VLC struggles to process the heavy video track and the lightweight audio track at the exact same speed.
The result is audio that either lags behind the video or jumps ahead of it. Fortunately, VLC has an entire suite of built-in tools designed specifically to fix sync issues on the fly. Whether your audio is off by a few milliseconds or completely ruined by a corrupted file, here is exactly how to synchronize your playback.
1. The On-the-Fly Fix: Keyboard Shortcuts
If you are watching a downloaded movie and notice the audio is just slightly off, you do not need to pause the video or dig through complex menus. VLC allows you to adjust the audio delay in real-time using two simple keyboard shortcuts. This is the fastest way to fix a poorly encoded file where the audio gap remains constant throughout the entire runtime.
- Press the ‘K’ Key: This pushes the audio track backward. If you hear the dialogue before the actor’s lips move, press K. Every time you press it, the audio is delayed by 50 milliseconds.
- Press the ‘J’ Key: This pulls the audio track forward. If the actor’s lips move, but the dialogue happens a moment later, press J. Each press brings the audio forward by 50 milliseconds.
As you press these keys, a small text notification will appear in the top-right corner of the VLC player, showing you exactly how much delay (e.g., “Audio delay 300 ms”) you have applied. Simply tap the keys until the voices match the mouth movements perfectly.
2. The Permanent Fix for Desynchronized Files
Keyboard shortcuts are great for a quick fix, but the settings reset the moment you close the player. If you have a specific video file that is permanently broken, or if you want to dial in the exact millisecond delay without guessing, you need to use the Track Synchronization menu.
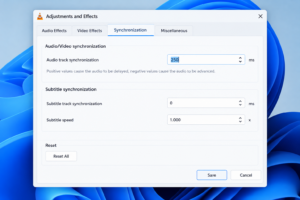
How to set a fixed audio delay:
- Open your out-of-sync video in VLC Media Player.
- Click on Tools in the top menu bar.
- Select Track Synchronization from the dropdown menu (or press the keyboard shortcut Ctrl + E).
- In the “Adjustments and Effects” window that pops up, click on the Synchronization tab.
- Look for the Audio track synchronization option under the Audio/Video section.
- Use the up and down arrows to adjust the timing. A positive value (e.g., 0.500 s) delays the audio, while a negative value (e.g., -0.500 s) speeds the audio up.
- Click the “Close” button. The delay will now remain active as long as you are playing that specific file during this session.
3. Disable Hardware-Accelerated Decoding
Modern media players use your computer’s graphics card (GPU) to decode heavy video files, taking the stress off your main processor (CPU). This is called Hardware-Accelerated Decoding.
While this keeps your computer running smoothly and saves laptop battery life, it is a massive source of audio sync issues. If your graphics card drivers are outdated, or if the video file uses a bizarre encoding method that your GPU does not understand, the video rendering will stall while the audio track keeps playing normally.
To turn off hardware acceleration in VLC:
- Click on Tools and select Preferences (or press Ctrl + P).
- At the top of the window, click on the Input / Codecs tab.
- Look for the setting labeled Hardware-accelerated decoding.
- Click the dropdown menu and change it from “Automatic” to Disable.
- Click Save at the bottom, then close and restart VLC completely for the change to take effect.
By disabling this, you force your CPU to do the heavy lifting. For 90% of desktop PCs, the CPU is more than powerful enough to handle standard 1080p and 4K playback without breaking a sweat, and this often cures audio stuttering instantly.
4. Increase the File Caching Value
If your audio sync gets progressively worse the longer you watch a video, or if the video constantly stutters while the audio plays flawlessly, you are likely dealing with a data bottleneck.
This usually happens when you are trying to play a massive, high-bitrate video (like an 80GB 4K Blu-ray rip) straight from a slow mechanical hard drive, a cheap USB thumb drive, or over a network connection. VLC tries to read the data, but the storage drive simply cannot feed the video frames fast enough.
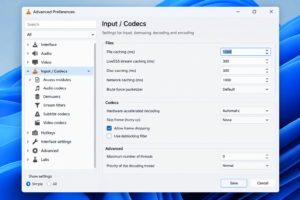
How to fix data bottlenecks by increasing cache size:
- Open VLC, go to Tools, and click Preferences.
- Look at the very bottom left corner of the Preferences window under “Show settings” and select the All radio button. This opens the advanced menu.
- In the left-hand column, click on Input / Codecs.
- Scroll down on the right side until you find the Advanced section.
- Look for File caching (ms). By default, this is usually set to 300 milliseconds.
- Change this value to 1000 (which equals one full second of buffering). If you are playing files over a network, change Network caching (ms) to 1000 as well.
- Click Save and restart VLC. This forces VLC to pre-load a larger chunk of the video into your fast system RAM before playing it, completely eliminating read-speed stutters.
5. The Progressive Desync Problem: Variable Frame Rate (VFR)
If you recorded a video using an iPhone, an Android smartphone, or screen recording software like OBS Studio, you might notice that the audio is perfectly synced at the start of the video, but is completely out of sync by the end.
This is the hardest issue to fix because it is caused by Variable Frame Rate (VFR). Smartphones change their video frame rate on the fly to save storage space. If a scene has a lot of action, it records at 60 frames per second (FPS). If the scene is perfectly still, it might drop to 24 FPS. Audio, however, is recorded at a constant rate. When you put a VFR video into VLC, the timeline math breaks down.
VLC cannot fix progressive VFR desync. You have to repair the file itself. To fix this, you need to run the video through a free, open-source transcoder like HandBrake. Drop your video into HandBrake, go to the Video tab, select Constant Framerate, and click Start Encode. HandBrake will permanently rewrite the video file so the frames are locked perfectly to the audio track.
6. Reset VLC Preferences
Sometimes, a software update corrupts VLC’s internal configuration files. If your audio is out of sync on every single video you play—even small, well-encoded files that work perfectly fine in Windows Media Player—your VLC profile is likely glitched.
To wipe the slate clean, open VLC, go to Tools > Preferences, and look at the bottom of the window. Click the button that says Reset Preferences. Confirm the prompt, close the application, and open it again. This returns VLC to its factory defaults, clearing any accidental delay toggles or corrupted audio output routing.
Frequently Asked Questions
Why is my audio out of sync only when I use Bluetooth headphones?
Bluetooth technology introduces inherent latency. It takes time for your computer to encode the audio, beam it through the air, and for your headphones to decode it. This often results in a 100ms to 300ms delay. To fix this, use the ‘J’ key in VLC to pull the audio forward by a few milliseconds to compensate for your specific Bluetooth headset’s lag.
Can a bad HDMI cable cause audio to go out of sync?
While rare, yes. If you have your PC connected to a TV or a soundbar using HDMI ARC (Audio Return Channel), handshake issues or a damaged, low-bandwidth HDMI cable can cause the video signal to process faster than the audio receiver can output sound.
Does converting an MKV to MP4 fix audio sync issues?
Usually, no. If the audio is out of sync in the original MKV container, simply changing the wrapper to MP4 will carry the exact same sync issue over. You must actively fix the frame rate (CFR) or apply an audio offset during the conversion process using a tool like HandBrake.
Why does my 4K video stutter and lose audio in VLC?
This is a classic symptom of your PC hardware struggling to decode high-efficiency codecs like H.265 (HEVC). The processor hits 100% utilization, and the audio drops out to keep the video moving. To fix this, ensure hardware acceleration is enabled, update your graphics drivers, or increase VLC’s file caching limit.
Sources & References
- To learn more about advanced player settings, consult the official VideoLAN Wiki Documentation.
- For comprehensive guides on repairing Variable Frame Rate issues, refer to the HandBrake Documentation.
- Ensure your PC’s audio drivers are up to date by checking your system updates via Windows Update.